R/S/E Roulette Mechanics
The Game Corner in Pokémon Ruby, Sapphire and Emerald featured the familiar slots minigame, like the previous two generations had - but also a new second minigame, a simple version of roulette, which I remember being more drawn to when I first played the games. It wasn't a game that one gave all too much thought to at the time - but as it turns out, the mechanics of the roulette minigame are pretty fascinating!
Roulette Basics
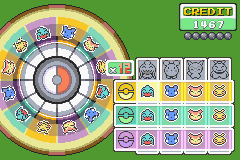
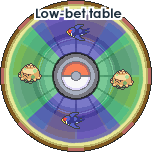
R/S/E's Roulette minigame is a variant on the casino standard. The Game Corner has two roulette tables, the 'low-bet' table (closer to the door, red background when playing) where you can only bet one coin at a time, and the 'high-bet' table (further from the door, green background when playing) where you usually bet three coins at a time, with the bet bumped up to six coins on the Game Corner's special Service Day.
Whichever table you play on, the table features a wheel rotating counterclockwise with twelve 'slots' around it, each represented by a combination of one of four designated Pokémon (Wynaut, Azurill, Skitty and Makuhita) and one of three designated colors (yellow, green and purple). You make a bet on either a color, a Pokémon, or a specific slot; then a ball is rolled onto the table, spinning clockwise around the wheel before finally landing in one of the slots. If the slot it lands on matches your bet, you win; otherwise, you lose.
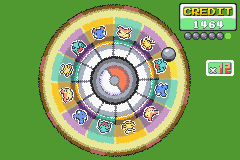
Afterwards, you can do another spin with another ball - but notably, the previous ball will remain in the slot where it landed, blocking that slot, until the table is reset after six rolls. If a ball would have landed in a slot that is currently occupied by a previous ball, it will instead bounce off the ball to one of the adjacent slots at random. If the chosen adjacent slot is also occupied, the ball will get stuck between the two:
And then you will get to witness the Roulette minigame's most curious feature: a Taillow or Shroomish will appear and dislodge your ball. Taillow will outright pick it up and hover with it for a bit before dropping it in an empty slot; Shroomish will just stomp down on the ground, shaking the table and causing the ball to bounce up and then land in an empty slot.

And that's all there is to the game on the surface level. You make a bet; you roll the ball; and it either lands in an empty slot, bounces off a previous ball into an empty slot, or gets stuck between two previous balls only for Taillow or Shroomish to come to the rescue and bump it into an empty slot.
Roulette Payouts
If you win a roll, then you get a payout equal to your bet multiplied by 12 / the number of empty slots on the wheel that would have won this bet. In other words, if you bet on one specific slot, then your payout is twelve times the bet. Meanwhile, on an empty table, each color appears four times on the wheel, so if you bet on a color the payout would be three times the bet, or if you bet on a Pokémon (each appearing three times), the payout will be four times the bet. Thus, the payouts for that first roll look like this:
| Bet type | Initial number of winning slots | Initial payout |
|---|---|---|
| Color | 4 | 3x |
| Pokémon | 3 | 4x |
| Slot | 1 | 12x |
Note that it counts the number of empty slots that match the bet, though - in other words, if there has been one previous ball which landed on the yellow Wynaut, then betting on Wynaut is in fact betting on just two remaining slots (green Wynaut and purple Wynaut), so the payout in that case will be six times your bet, while betting on yellow in the same situation will pay out four times your bet instead of three. And any bet that's in practice a bet on just one specific slot will pay out twelve times, even if it's technically a color or Pokémon bet. So a more comprehensive payout table for the whole game would simply look like this:
| Number of empty winning slots | Payout |
|---|---|
| 1 | 12x |
| 2 | 6x |
| 3 | 4x |
| 4 | 3x |
You may notice that unlike real roulette, there are no zero slots to give the house an advantage - the expected value of the first roll is to exactly break even, since regardless of your bet, the odds of winning times the payout cancel out to 1. Moreover, thanks to the previous balls staying on the table after the roll and blocking those slots altogether, each subsequent roll up through the sixth actually ends up with better odds: if you bet on a single slot while one slot on the wheel is occupied, the payout is still 12x but there are now only eleven slots the ball could land on!
By itself, this would mean the average payout of a completely random bet would be 1x (12/12) on the first roll, ~1.09x (12/11) on the second, 1.2x (12/10) on the third, ~1.33x (12/9) on the fourth, 1.5x (12/8) on the fifth, and ~1.71x (12/7) on the sixth before being reset back to 1x. On average, playing this roulette completely at random, you will thus inevitably keep earning more coins, if slowly (very much unlike in real casinos, which use careful math to ensure that the house always has the advantage and players will always end up losing money the longer they keep playing).
However, thanks to the minigame's mechanics, you can beat those odds by making the correct plays.
The Significance of Persistent Balls
As I mentioned previously, if the slot the ball would have landed in happens to be already occupied by a previous ball, it will bounce toward the left or right at random (50% chance of each), landing in the adjacent slot in that direction if it's unoccupied, or otherwise getting stuck between the two balls.
Therefore, the ball is more likely to end up in a slot that's next to an occupied slot: with equal odds of the ball landing anywhere on the wheel, then in addition to the default 1/12 chance of it just happening to end up on that one, each occupied slot that's next to it adds a 1/24 chance that it lands on that slot and then bounces to this one. A bet on a single slot with an occupied slot on one side of it still pays out at a 12x rate, but the chance of the ball landing there is 3/24 or 1/8; meanwhile, the chance of landing on a slot with both adjacent slots occupied is a full 4/24 or 1/6!
Conversely, that's where those improved odds once you've rolled a few balls are mostly concentrated: if you were to just keep betting on slots that aren't next to occupied slots, you wouldn't be seeing those big gains to your odds with more balls on the screen. As a kid I actually remember mostly betting on slots that weren't next to where the previous balls had landed, out of some vague sense that the occupied slots meant there were fewer ways for the ball to end up on that part of the wheel, but that was unfortunately exactly the wrong strategy!
So What About Stuck Balls?
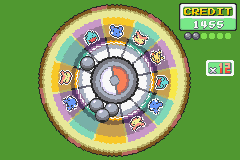
So what if the ball does get stuck between two occupied slots? Depending on how the balls currently on the table are distributed, the odds of this happening for a given roll can be up to 33% (if on the sixth roll the previous five balls are all adjacent to each other), and all in all, for each set of six rolls there's also about a one third chance that a ball will get stuck at some point, so this isn't exactly an uncommon occurrence. What exactly happens when Taillow and Shroomish come to the rescue? I figured probably this was just a cute way to animate the ball getting bumped to one of the remaining unoccupied slots at random, but the truth turned out to be a whole lot wilder than that. Strap yourselves in.
When a ball has gotten stuck, the game will do the following:
- First, determine whether the Pokémon to rescue the ball will be Shroomish or Taillow. Essentially, this is done based on where the ball is located on the screen when it gets stuck, for purposes of sensible animation timing. Shroomish performs the rescue by bouncing the ball up just when it hits the twelve o'clock or six o'clock position on the wheel, while Taillow performs the rescue by flying in from the left or right side of the screen and grabbing the ball just when it's in the three o'clock or nine o'clock position. But the game will also need a moment to show the rescuer appearing on the screen before it can rescue the ball, and the wheel will keep on rotating counterclockwise while that's happening - so if the ball is currently for instance in the three o'clock position, it'll pick Shroomish, because then the timing is about right for it to make it into the twelve o'clock position when Shroomish is ready to bounce it. The images below show the zones where each Pokémon will be chosen - the high-bet table needs a little more wind-up since the wheel goes faster.

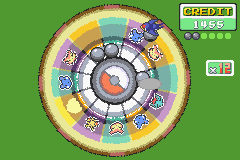
- Consider alternative slots the ball could land in, starting from the slot two slots ahead from the latter of the two slots the ball is stuck between, counting clockwise. (In other words, it'll skip the slot right after the two it's stuck between - probably because it'd be awkward to animate the rescuer bumping it that short of a distance.) We will consider the five next slots starting with that one, unless we're at the high-bet table and the Pokémon coming to the rescue is Taillow, in which case we will consider the nine next slots starting with that one. In the screenshot below, where the ball is stuck near the bottom, the green-shaded slots will always be considered, while the blue-shaded slots will be considered additionally by Taillow on the high-bet table.
- If we have the Pokémon that's coming to the rescue (Taillow or Shroomish) in our party, and a winning slot exists among the slots we're considering, then there is a 75% chance that they will drop the ball in the first such winning slot.
- Otherwise, the ball will land in one of the unoccupied alternative slots at random. (There will always be at least two unoccupied slots among these alternative slots, since we can have no more than five balls already on the table, and we already know two of them are the ones we got stuck between - that leaves maximum three balls that might be among the 5/9 slots we're considering.)
This has several fascinating implications. First of all, bringing a Taillow and Shroomish with you when playing roulette will very directly improve your odds. Every time the ball gets stuck, then provided there's a winning slot within range, there's a 75% chance your Pokémon will just automatically win for you, in addition to the regular chance that they bump it into a winning slot by coincidence!
Furthermore, the fact it doesn't consider all the remaining slots as possibilities has interesting consequences for the odds. While generally you want to bet on a slot that's next to an occupied slot, the slot that comes right after two occupied slots is actually taken out of consideration if the ball gets stuck between them - and conversely, while Taillow on the high-bet table will consider every other empty slot, other stuck cases will only look at the next five slots, meaning those will all have somewhat better odds of being picked than otherwise. All in all, this complicates the odds a bit, making the theoretical optimal strategy a little more interesting than just, "Bet on whichever slots have occupied slots next to them."
The practical upshot of this for the odds is, more or less:
- You're always best off betting on a slot that's sitting between two occupied slots.
- If you don't have one of those, then you'll want to bet on a slot next to a single occupied slot. Your best bet is if you have Shroomish and/or Taillow in your party and this slot is also one of the next five slots after the slot after a couple of adjacent occupied slots, counting clockwise; all the better if it fits the bill for multiple pairs of adjacent occupied slots. For example, if there are exactly three balls on the table and they're in three adjacent slots, you want the slot that comes clockwise right after that cluster, because the ball might land there both if it lands on the third ball in the cluster and if it gets stuck between the first two balls in the cluster and gets rescued by Taillow/Shroomish. If there are four or five balls on the table and they're all adjacent, each of them improves the odds of the slot right after the cluster.
- If you're on the high-bet table and have Taillow in your party, then if there are exactly two adjacent balls on the table, you want the one next to those counterclockwise, because it is both adjacent to an occupied slot and Taillow might carry your ball there if it gets stuck between them, while the one next to them clockwise can't be chosen by Taillow or Shroomish.
If that breakdown's a little confusing, here's an interactive demonstration. Click the white part of a slot on the wheel below to place a ball in that slot (remember, you can only place up to five at a time), or click the colored bit to set it as a winning slot for your current bet. The colored bars around the wheel will adjust to show the odds that a ball will land there given the configuration of balls you've placed.
However, there's even more than this to this innocuous-looking minigame; we've only just gotten started.
Roulette Physics
Prior to looking into how the roulette minigame works, I figured the actual ball-rolling might just as well be 'fake' - that the game might simply decide first with a random number generator which slot the ball will end up in and then show an animation pre-rigged to land it there. This is not the case: the game genuinely uses a bit of a simplified physics simulation for this, with the ball slowly decelerating, falling towards the middle and landing in the slot that happens to be under it when it approaches the center, like in real roulette. Specifically, here's how the roulette physics work (this is quite technical and mostly interesting to nerds like me; feel free to skip this if you just want to get to the implications):
- Initialize the relevant variables:
- Generate a single two-byte random integer r, with a range from 0 to 65535 inclusive.
- The ball physics are calculated using polar coordinates. In each of the angular direction (around the wheel) and radial direction (distance from the center of the wheel), the ball has a position coordinate value, a velocity, and an acceleration - six physics values all in all, though the radial acceleration is actually fixed at zero and never used.
- A fuzz range value is calculated, based on a number of interesting factors that I will get into later. For the moment, it suffices to say that the possible fuzz range values are 1, 3, 7, 15, 30, 60 and 120, and the fuzz range on the high-bet roulette table will generally be half of what the fuzz range would be on the low-bet table, rounded down (3 is only possible on the high-bet table and 120 is only possible on the low-bet table, but 1 is the lowest possible value on both tables).
- A roll inertia value is calculated:
- First, fetch the table's base inertia, which is 360 on the low-bet table and 270 on the high-bet table.
- Calculate a fuzz value, calculated by taking the random number r and then calculating
(r % n) - floor(n / 2)where n is the fuzz range calculated above. This means that if the fuzz range is 30, then the fuzz value can be anywhere from -15 to 14 inclusive - in general, the range of the fuzz value is[-floor(n / 2), ceil(n / 2) - 1]. - Add the fuzz value to the base inertia. The result can range from 300-419 on the low-bet table and 240-299 on the high-bet table.
- Divide this value by five to get the final base roll inertia value, which we will call g.
- An initial angular coordinate is calculated. The angular coordinate works a bit like degrees in trigonometry - it's a value that can be anywhere from 0 to 359, standing for the angle of where the ball is on the wheel - but instead of 0 being on the far right side, 0 is at the top (twelve o'clock), and it increases in a clockwise instead of counterclockwise direction around the circle, so that 90 is on the far right (three o'clock), 180 is at the bottom (six o'clock), and 270 is on the far left (nine o'clock). Before 1PM, the starting angular coordinate has an 80% chance (determined by checking if
r % 100is less than 80) of being picked as either 0 or 180 (that is, a 40% chance of each) and a 20% chance of either 90 or 270 (10% chance of each); after 1PM, it has an 80% chance (ifr % 100is less than 80) of being 90 or 270 and a 20% chance of being 0 or 180. In each case, we pick 0 or 90 if r is even, and 180 or 270 if r is odd. - The initial angular velocity is set to the starting ball velocity defined for the roulette table (this is 10 on both tables).
- The angular acceleration is set to negative half the initial angular velocity divided by the roll inertia g times three rounded down - that is,
-5 / floor(g * 3). In other words, the higher the roll inertia value, the slower the ball will decelerate as it goes around the table. - The initial radial coordinate (distance from the center of the wheel) is set to 68.
- The initial radial velocity is set to
-8 / floor(g * 3). Thus, the higher the roll inertia, the slower the ball will fall towards the center of the wheel, and the longer it will continue to roll before the ball falls into a slot. - As mentioned earlier, the radial acceleration is unused; it is simply set to zero and remains so throughout the roll.
- On each frame (sixty times a second), simulate the movement of everything:
- Calculate the current rotation angle of the roulette wheel. The high-bet table's wheel will rotate backward (counterclockwise) by one degree every frame; the low-bet table's wheel will rotate backward by one degree every other frame, so that the high-bet table rotates twice as fast. The roulette wheel sprite will be rotated accordingly.
- Calculate the next state of the ball's physics values:
- Add the angular acceleration value to the angular velocity.
- Add the angular velocity to the angular coordinate, subtracting 360 if the result is greater than or equal to 360.
- Add the radial acceleration value to the radial velocity (since the radial acceleration is always zero, this never changes anything).
- Add the radial velocity to the radial coordinate.
- Place the ball sprite where it should be located on the screen according to the angular and radial coordinates.
- Once the radial coordinate is less than or equal to 60, set the radial velocity to
-20 / floor(g)and the angular acceleration to be(1 - angular velocity) / floor(g), causing it to slow down and fall significantly faster from there (this is where the roulette wheel visually appears to slope a little down toward the center, which makes sense). - After that, once the radial coordinate is less than or equal to 40, set the radial velocity to
-4 / floor(g)and the angular acceleration to be-angular velocity / floor(g)(slower again, as we've reached the inner circle). - Once the radial coordinate is less than or equal to 40, then after that, once the angular velocity has fallen below 0.5, then:
- If the ball's integer angle relative to the roulette table does not line up with the center of one of the roulette slots, then if the angular acceleration is not zero and the angular velocity has become negative (i.e. the ball has tipped over to moving clockwise with the roulette table), set the angular acceleration and velocity to 0 and divide the radial velocity by 1.2, causing it to stay at the same angle, slowing toward a halt, until the roulette table rotates underneath it to an angle that lines up.
- Otherwise, if the ball does line up with the center of one of the roulette slots, then set the angular acceleration to 0 and adjust the angular velocity to subtract 0.5 if we're on the low-bet table or 1 on the high-bet table. Then proceed to step 3.
- Once the ball has been lined up with the center of one of the roulette slots, process the ball landing on that slot.
- If the slot is not occupied, then the ball simply lands there: set the ball's radial coordinate to 30, set its angular coordinate to the current center of the slot, and change the ball's physics so that it simply follows the rotation of the table from here.
- If the slot is occupied, then choose either the next or previous slot at random (50% chance of each), and the ball will be bounced towards that slot, using its own little separate physics routine. If that slot is unoccupied, then it simply lands there, and we get our payout. If it is also occupied, then the ball will get stuck between the two slots; determine whether Shroomish or Taillow comes to the rescue:
- Choose a base angle o. This angle is equal to 33 + (30 if playing on the high-bet table, otherwise 0) + 15; that is, it is 48 on the low-bet table and 78 on the high-bet table.
- Consider which quadrant the stuck ball is located in, relative to the base angle o: if it is in the first or third quadrant (between o and o+90 degrees, or between o+180 and o+270 degrees), then Shroomish will come to the rescue, while if it is in the second or fourth quadrant (between o+90 and o+180 degrees or between o+270 and o degrees), Taillow will come to the rescue.
- Starting from the slot two after the latter of the slots the ball is stuck between, consider the next five slots (if Shroomish or on the low-bet table) or the next nine slots (if Taillow on the high-bet table). For each of those slots, if it is unoccupied, add it to a list of available rescue slots. Also note down the first winning slot found (i.e. the first slot checked that matches the current bet), if any.
- Generate a new two-byte random number q (ranging from 0 to 65535) and determine which slot the rescue Pokémon should drop the ball in:
- If the player has the rescue Pokémon in their party, at least one winning slot was found and
q % 256is less than 192 (75% chance), then the ball will be dropped in the winning slot noted earlier. - Otherwise, calculate
q % the number of available rescue slots. The ball will be dropped in the slot at that index of the list of available rescue slots: that is, if the outcome is zero, it will be bumped into the first available rescue slot, and so on.
- If the player has the rescue Pokémon in their party, at least one winning slot was found and
So What Does That Mean?
All in all, the ball really is rolling according to a kind of simulated physics, although it is simplified and not realistic. There are, on the face of it, two sources of randomness in how it plays out:
- Firstly, the starting position of the ball can be either at the top, bottom, left or right side of the wheel, with a bias towards the top or bottom if the current time is before 1PM and a bias towards the left or right after 1PM; the favored starting positions have a 40% chance each, while the disfavored starting positions have a 10% chance each.
- Secondly, the rate at which the ball decelerates, determined by the 'roll inertia', depends on which table we're playing on (on the green, high-bet table, the ball will decelerate faster) and on a random number generated for each roll, the fuzz value. The range of the fuzz value, the fuzz range, also varies depending on a number of different factors.
(That framing is ever so slightly misleading: as explained above, the game technically only generates one random number between 0 and 65535 inclusive for the roll, and the starting position and fuzz value are both based on that one number. They're derived from it in different ways, but they are not completely independent: if the random number is even, then that means both that the starting angle is either 0 or 90 and that, so long as the fuzz range is even (30/60/120), the fuzz value itself will be even, and vice versa. This does not matter terribly much for our purposes for now, but please do put a pin in this.)
Exactly what the position of the wheel is when we start the roll also determines which slot the ball actually lands on, of course - but that's technically only as random as we choose to make it, since we can decide exactly when to make our bet and roll the ball! If we wanted the wheel to start in a certain position, all we'd have to do is wait for it to be in that position before we roll. Of course, though, we don't quite start with any information on the face of it to tell us what starting position is better than another; probably you have in fact been playing with the starting position of the wheel being effectively random, which makes where the ball lands ultimately random, too.
If the ball's starting position and fuzz were sufficiently random, in theory the outcome of the roll would also be random even for a fixed initial wheel position. However, there are only four possible starting positions which have different odds, and if you read the full physics explanation, you may have noticed that the fuzz range can be as low as 1, in which case the roll would be completely deterministic once the starting position has been determined! Thus, it's worth taking a closer look at how the fuzz range works. What exactly is this value, how is it determined, and exactly how much does the fuzz range influence the odds?
The Fuzz Range
Yeah, this one is also a bit wild.
To recap, the fuzz range determines how much variation there can be in what I call the 'roll inertia' value, which determines the rate at which the ball decelerates as it goes around the table. The higher the fuzz range, the more possible roll inertia values there are, and thus the more differently the ball might roll each time; the lower the fuzz range, however, the more consistent the rolls are, and the more it might be possible to influence where the ball lands based on when you start the ball rolling.
The two roulette tables have two different base fuzz values each, the high fuzz (60 on the low-bet table and 30 on the high-bet table) and the low fuzz (30 on the low-bet table and 15 on the high-bet table); since these values are used as the basis for the returned fuzz range, in general the fuzz ranges for the high-bet table are always half of what they would be on the low-bet table, and thus the high-bet table has significantly more consistent rolls. The only exception is certain cases where the returned fuzz range is 1, in which case it would be 1 on both tables.
How is this fuzz range determined? With a bizarrely complex calculation that I truly couldn't make heads or tails of as I was initially analyzing this. Note that the fuzz range is always an integer, and the divisions shown here like lowFuzz / 2 or lowFuzz / 4 are always rounded down:
- If you have neither Shroomish nor Taillow in your party, then:
- If the current time is between 4:00 AM and 9:59 AM, then:
- If r is divisible by four, return 1
- Otherwise, return lowFuzz / 2
- Otherwise, then if r is divisible by four:
- If we've made twelve or more rolls in this roulette session already (note that this counter is not reset when the board is), return lowFuzz / 2
- Otherwise, return lowFuzz
- Otherwise, then if r is greater than or equal to 32768 (50% chance):
- If we've made twelve or more rolls in this roulette session already, return lowFuzz
- Otherwise, return highFuzz
- Otherwise, return highFuzz * 2
- If the current time is between 4:00 AM and 9:59 AM, then:
- If you have a Shroomish or Taillow in your party, but not both, then:
- If the current time is between 4:00 AM and 9:59 AM, then:
- If we've made eleven or more rolls in this roulette session already, and r is even, then return 1
- Otherwise, return lowFuzz / 2
- Otherwise:
- If r is divisible by four, return lowFuzz / 2
- Otherwise, return lowFuzz
- If the current time is between 4:00 AM and 9:59 AM, then:
- If you have both Shroomish and Taillow in your party, then:
- If the current time is between 4:00 AM and 10:59 AM, then:
- If we've made five or more rolls in this roulette session already, and r is even, then return 1
- Otherwise, return lowFuzz / 2
- Otherwise, if we've made six or more rolls in this roulette session already, and r is odd, then return lowFuzz / 4
- Otherwise, return lowFuzz / 2
- If the current time is between 4:00 AM and 10:59 AM, then:
This elaborate decision tree feels like arbitrary chaos, but the essential idea of it seems to be about three things:
- The fuzz range will tend to be smaller, and thus the rolls more consistent, if you have Shroomish and/or Taillow in your party - ideally both.
- The fuzz range will tend to be smaller if you're playing in the morning than at other times of day; with both Shroomish and Taillow in your party, you get an extra hour of leeway for what counts as morning.
- The fuzz range will tend to get smaller once you've done enough rolls in a single session.
My best guess as to why the fuzz range works like this is that - well, at first I didn't have one, wondered if this was one of those things that are based on some particular Japanese idiom or cultural reference that would make no sense to anyone else. But it started to make a little more sense when I properly grasped that in the physics calculation, the fuzz range essentially represents variation in friction. (I referred to it as ball inertia above to avoid causing confusion when a higher value means less friction, but it's more illuminating to regard it as a measure of friction.)
So for the purposes of what's being simulated here, what would cause variation in friction? Perhaps something like unevenly distributed dirt or grease on the roulette ball. And I can at least hypothetically connect these factors to that. Probably the 'advanced' table with the bigger bets will have nicer equipment generally. Maybe the more often you roll the ball, the dirt gets rubbed off or smoothed out. Maybe, when you arrive at the Game Corner in the morning, everything's freshly cleaned and polished, while over the course of the day the balls or tables will accumulate some dirt and grime. Maybe your Shroomish and Taillow, who as we've discussed are already willing to cheat for you, are just going to help polish your roulette balls before you use them.
Is it a stretch? Maybe, but it's the best I've come up with.
There's one more interesting little thing to the decision tree, which is not flavor-relevant but is relevant to the math: whether the random number r is even or odd often influences the fuzz range. This matters because this is the same random number r that we're using to calculate the starting angle and fuzz value: if r is even, that also means the starting angle will be 0 or 90, and if it's odd, the starting angle will be 180 or 270. Thus, while the programmers seem to have generally tried to use the random number in different ways for each randomized part of the calculations here, so that the fact they only randomized it once wouldn't matter too much, they seem to have overlooked that the starting angle and the fuzz range are highly correlated: in most cases, the fuzz range will be different if the starting angle is 0 or 90 (top or right side) than if it's 180 or 270 (bottom or left side).
In particular:
- In the morning:
- If we have neither Taillow nor Shroomish, the fuzz range will be 1 if r is divisible by four, or lowFuzz / 2 otherwise. r can only be divisible by four if it is even, so this will happen about half the time if the starting angle is 0 or 90, but never if it's 180 or 270.
- If we have Taillow or Shroomish but not both and we've already played eleven or more rolls, or if we have both Taillow and Shroomish and we've already played five or more rolls, then the fuzz range will always be 1 if the starting angle is 0 or 90, but lowFuzz / 2 if it's 180 or 270.
- At other times of day:
- If we have neither or only one of Taillow and Shroomish, then the fuzz range will be lower if it is divisible by four, which again means that happens half of the time if the starting angle is 0 or 90, but never if it's 180 or 270.
- If we have both Taillow and Shroomish, and we've made six or more rolls in this session, then the fuzz range will always be lowFuzz / 2 if the starting angle is 0 or 90, but lowFuzz / 4 if the starting angle is 180 or 270. (Note that in this one case, the fuzz range is smaller if the starting angle is 180 or 270, but in all the others it's smaller when the starting angle is 0 or 90!)
This is quite significant especially in the morning, when a starting angle of 0 or 90 is either guaranteed to or will half of the time have a fuzz range of 1, which means it will always have the exact same fuzz value, 0 - in other words, these rolls will always play out in the exact same way, and thus always land in the exact same slot relative to the starting angle!
All in all, the nature of the fuzz range means that while playing on the low-bet table with neither Taillow nor Shroomish in the not-morning will yield different but relatively low odds for all the slots, you can actually make a very good educated guess as to where the ball might land once you know how to optimize the consistency. Supposing that you maximize your odds by bringing Shroomish and Taillow and playing at the high-bet table in the morning, then your first few rolls will have a fuzz range of 7, but from the sixth onwards the fuzz range will be 1 if the starting angle is 0 or 90 and 7 if it's 180 or 270. That really is very good - a full 40% of your rolls will start at the top of the wheel and then always roll in the exact same way from there, ending in the slot that was at the very bottom when the ball started rolling.
The ball starts rolling a little after you actually press A to make your bet, so the slot that's at the bottom when the ball starts rolling is roughly the slot that's in the eight o'clock position when you make your bet - in other words, you'll want to wait for approximately the moment the slot that's two slots counterclockwise from your bet first touches the very bottom of the wheel. If that's unclear, the screenshot below shows the approximate timing when you'd want to react to press A to make your bet, assuming the slot you're betting on is in the position of the yellow Wynaut (flashing yellow in the screenshot). If you get the timing right, you should consistently win the jackpot 40% of the time - every time the top starting angle is chosen.
This really does work, not just in theory but in practice - when I tried doing it myself for a hundred spins, with only a rough human sense of timing, the ball landed in this slot 35 times, with the remaining five cases that started from the top being clumsy one-off mistakes where I rolled just a little too early or late. (The fact it was exactly 40 starting from the top is a coincidence, of course - but the longer you play, it will average out to approximately 40 per one hundred rolls.)
The Plain English Takeaways
So, what should you take away from all this? How do you win at roulette?
First of all, based on pure statistics and the assumption the ball will land in a random slot:
- By default, the roulette payouts are designed to exactly break even on an empty table, but because balls from previous rolls will stay on the table occupying certain slots so the ball can't land there again, on average you would slowly keep earning more coins if you kept playing roulette completely at random.
- The ball is significantly more likely to land next to an already occupied slot (one where a ball has already landed on the previous rolls), since if the ball would have landed in an occupied slot, it will have a 50% chance of being bounced to each adjacent slot. If there's a slot with occupied slots on both sides of it, bet on that one; if not, bet on one that's got one occupied slot next to it.
- If the ball gets stuck, it will be bumped to a different slot by either Shroomish or Taillow. The range of possible slots where they might drop the ball is shown in the image below; relative to the slots the ball is stuck between, the green-shaded slots will always be in range, while the blue-shaded slots will also be considered if the ball is rescued by Taillow on the high-bet table. Normally, the stuck ball will be dropped in one of these slots at random. This increases the odds the ball will end up in one of these slots, relative to a pair of adjacent occupied slots.
- Taillow or Shroomish is chosen for the rescue based on where the ball is on the screen when it gets stuck. Shroomish rescues the ball by bouncing it up when it's in the twelve o'clock or six o'clock position, and Taillow rescues it by picking it up from the three o'clock or nine o'clock position; the animation will need to start a bit before the ball reaches the appropriate position, so the Pokémon who does the rescue is going to be whichever one the game can get onto the screen before the ball passes one of its trigger positions. The zones where a given rescue Pokémon will be picked are slightly different depending on whether you're playing on the low-bet (red background) table or the high-bet (green background) table:
- Taillow and Shroomish will cheat for you if you have them in your party. Any time the ball gets stuck between two occupied slots, if you have whichever Pokémon is chosen to rescue the ball in your party, they have a 75% chance of dropping the ball in the first winning slot within range, provided there is one. (The remaining 25% of the time, they will drop it in a random slot within range as usual - so it might also land on a winning slot by pure chance! This means the real chance of winning when you have the rescue Pokémon in your party and at least one winning slot is in range is more than 75%, depending on how many empty slots are in range and how many of them are winning slots.)
However, under the right conditions, you can also get significantly better odds through timing your bet right:
- Rolls will start in one of four starting positions, twelve o'clock, three o'clock, six o'clock or nine o'clock. From midnight until 12:59 PM, the twelve o'clock and six o'clock starting positions are more likely to be picked (40% chance each) while the three o'clock and nine o'clock positions are less likely (10% chance each); from 1 PM to midnight, this is reversed, so that three o'clock and nine o'clock have a 40% chance each and twelve o'clock and six o'clock are 10% each.
- Rolls will broadly be more consistent, and thus more predictable, on the high-bet table than on the low-bet table; in the morning than at other times of day; when you have Shroomish and/or Taillow in your party, ideally both; and when you have played several rolls in the same session. You can use the simulator below to learn what the odds will look like in any given situation.
- Under ideal conditions - on the high-bet table, between 4 AM and 11 AM, with both Shroomish and Taillow in your party, after you've played five or more rolls - the ball has a full 40% chance of landing in the slot that was two slots away from the very bottom when you made your bet. Thus, if you play under those ideal circumstances, you will want to press A to make your bet when the wheel is in roughly this position, where your bet is the yellow Wynaut (flashing bright yellow in the screenshot):
- Betting on a single slot is the most efficient. While color bets benefit from some good synergy under ideal conditions with well-timed play, since when the roll itself is very consistent each of the four starting positions will land on the same color (all in all the ball has about a 78.6% chance of landing on the most likely color in the ideal case, compared to a 33.3% chance if it were fully random), the respective payouts make it not worth it - each bet on the ideal color on an empty board on average will net you about 2.36x your bet, while each ideal single-slot bet on an empty board will net you 4.8x your bet on average. (Meanwhile, even the best ideal Pokémon bet will only get you 1.78x your bet on average on an empty board, because the most likely individual slots are always the same color but never the same Pokémon.)
Roulette Calculator
Use this calculator to simulate the roulette physics, work out the possible fuzz ranges in your situation, and calculate the odds of the ball landing in a given slot (assuming that slot is empty).
Page last modified November 20 2025 at 17:02 UTC
Post comment
Inflammatory or off-topic comments will be deleted; please go to the guestbook for discussion unrelated to this page. You can use BBCode (forum code) to format your messages.
Giving an e-mail address is optional; if it is given, you will be notified by e-mail if I respond to your post. If you fill in a website (this should be your own website, blog or social media profile), it will be linked publicly on your post.
- [b]Bold[/b]
- [i]Italic[/i]
- [u]Underlined[/u]
- [s]Strikethrough[/s]
- [url=http://www.dragonflycave.com]Link[/url]
- [spoiler]Spoiler[/spoiler]
Comments
My own messages will be signed as Butterfree, with the Admin label below my name. If someone signs as Butterfree without that label, it's probably not me.
Pages: 1
 betelplouf
 ZoranaDragon
 Eevote
Pages: 1