Gen I Capture Mechanics
Special thanks to a_magical_me, who started analyzing the algorithm, let me use their notes and then provided me with an assembly dump to pick up where they left off. The hacking genius is mostly theirs.
If you were an avid player of Red, Blue and Yellow, you may have read the other capture mechanics sections and fleetingly wondered, "But what about the times in R/B/Y when it would say, 'You missed the POKéMON!'? What was going on then? How much of this stuff was the same back then, anyway?"
How much, indeed? As it turns out, barely any. The R/B/Y capture algorithm is drastically different from that of the later games; in particular, it really is an algorithm rather than mostly a straightforward formula. And it is also, as it happens, quite interesting - especially if you, like me, have always sort of wondered exactly how that worked. So sit back, relax, and let's take a look at the insides of the game. Or, well, if you don't care about the insides of the game, you can always skip down to the basic summary of how capturing is different in R/B/Y.
Meanwhile, if all you want to do is find out how likely you are to capture a Pokémon in R/B/Y, you'll want the catch rate calculator.
The Algorithm
The capture algorithm proper, as listed below, applies to regular wild Pokémon battles. A few sanity checks are handled before we get to that part:
- If you're not in battle, you can't use a ball. "OAK: This isn't the time to use that!"
- If this is a trainer battle, the capture immediately fails. "The trainer blocked the BALL! Don't be a thief!"
- If this is not the Old Man's tutorial battle in Viridian City, then if both your party and your current box are full, you can't throw a ball. "The POKéMON BOX is full! Can't use that item!"
- If this is a battle against an unidentified ghost, or if the Pokémon is a Marowak and the player's current location is the sixth floor of Pokémon Tower (in an unmodified game, the latter will only happen for the special ghost Marowak), the capture immediately fails. "It dodged the thrown BALL! This POKéMON can't be caught!"
Otherwise, to determine the outcome of a thrown ball, the game executes the following procedure (cleaned up and tweaked for human presentation, of course). Note that any time it speaks of division, it means integer division: the result is an integer and the remainder is simply discarded. Thus, for example, if it says "Divide 5 by 2", the result is simply 2, not 2.5.
- If the ball being thrown is a Master Ball, the Pokémon is automatically caught. Skip the rest of the procedure. (Yes, the Master Ball is an automatic guaranteed success, as long as you pass the sanity checks above. There is an extremely persistent rumour that it actually has a 1/256 or 1/65536 chance of missing; whatever you may have heard, wherever you heard it, it is not true. It is true that moves that were meant to be 100% accurate would have a 1/256 chance of missing in R/B/Y, but this has no relation to how the Master Ball works in any game; it always simply skips the calculation entirely.)
- Generate a random number R1, with a range depending on the ball used:
- If it's a Poké Ball, R1 ranges from 0 to 255 (inclusive).
- If it's a Great Ball, R1 ranges from 0 to 200 (inclusive).
- If it's an Ultra or Safari Ball, R1 ranges from 0 to 150 (inclusive).
- Create a status variable S:
- If the targeted Pokémon is asleep or frozen, S is 25.
- If the targeted Pokémon is poisoned, burned or paralyzed, S is 12.
- Otherwise, S is 0.
- Subtract S from R1 (to avoid confusion with the original R1, I will refer to the result as R*).
- If R* is less than zero (i.e. if the generated R1 was less than S), the Pokémon is successfully caught. Skip the rest of the procedure.
- Calculate the HP factor F:
- Multiply the Pokémon's max HP by 255 and store the result in F.
- Divide F by
- 8 if the ball used was a Great Ball.
- 12 otherwise.
- Divide the Pokémon's current HP by four (if the result is zero, bump it up to 1). Divide F by this number and make that the new F.
- If F is now greater than 255, make it 255 instead.
- If the base catch rate of the Pokémon is less than R*, the Pokémon automatically breaks free. Skip to step 10.
- Generate a second random number R2 ranging from 0 to 255 (inclusive).
- If R2 is less than or equal to the HP factor F, the Pokémon is caught. Skip the rest of the procedure.
- If we get here, the capture fails. Determine the appropriate animation to show:
- Multiply the Pokémon's base catch rate by 100 and store the result in a wobble approximation variable W.
- Divide W by a number depending on the ball used, rounding the result down:
- If it was a Poké Ball, divide by 255.
- If it was a Great Ball, divide by 200.
- If it was an Ultra or Safari Ball, divide by 150.
- If the result is greater than 255, the ball will wobble three times; skip the rest of this subprocedure. (This can't actually happen, since the Pokémon's base catch rate can never be greater than 255 and we just multiplied it by 100 and then divided it by something greater than 100, but given the shenanigans that can happen when Game Freak forgets to include failsafes, I don't blame them.)
- Multiply W by F (the HP factor calculated above).
- Divide W by 255.
- Add a number if the Pokémon has a status affliction:
- If the Pokémon is asleep or frozen, add 10 to W.
- If the Pokémon is poisoned, burned or paralyzed, add 5 to W.
- Show the animation and message corresponding to W:
- If W is less than 10, the ball misses ("The ball missed the POKéMON!").
- If W is between 10 and 29 (inclusive), the ball wobbles once ("Darn! The POKéMON broke free!").
- If W is between 30 and 69 (inclusive), the ball wobbles twice ("Aww! It appeared to be caught!").
- Otherwise (if W is greater than or equal to 70), the ball wobbles three times ("Shoot! It was so close too!").
What It Means
(Psst, if you don't speak math, you can skip down to the plain English summary, which has almost no math at all. It's simple, I promise!)
So what does this algorithm actually mean for capturing in R/B/Y? How is it different from the later games? (In the rest of this discussion, I will assume you are not using a Master Ball; that case is trivial and it would be a bother to keep mentioning it.)
Well, first, let's look at what the structure of the algorithm actually theoretically means for our chances of capturing the Pokémon. (This gets a bit mathematical, but bear with me.) Let's call the Pokémon's base catch rate C and create a ball modifier variable B to stand for the range of the first random number R1: 256 if the ball is a Poké Ball, 201 if the ball is a Great Ball and 151 if the ball is an Ultra Ball. (Note that this is one higher than the maximum numbers discussed in the algorithm above; this is because a random integer between 0 and X inclusive can take on X+1 possible values, the way that 0–2 inclusive means three values, 0, 1 and 2.) Depending on where R1 falls in this range, three different things can happen:
- If R1 is less than the status variable S, the Pokémon is immediately caught.
- If R1 is greater than or equal to S, but less than or equal to S + C, the game calculates a second random number R2 between 0 and 255 inclusive and an HP factor F. These numbers are then compared:
- If R2 is less than or equal to F, the Pokémon is caught.
- If R2 is greater than F, the Pokémon breaks free.
- If R1 is greater than S + C, the Pokémon breaks free.
Of the total of B possible R1 values, S of them result in the first path (auto-capture), C + 1 of them (up to a maximum of B - S, since there are only B - S values left) result in the second path where R2 and the HP factor F are calculated, and the rest (if any) result in the third path (auto-failure). We can visualize it like this:
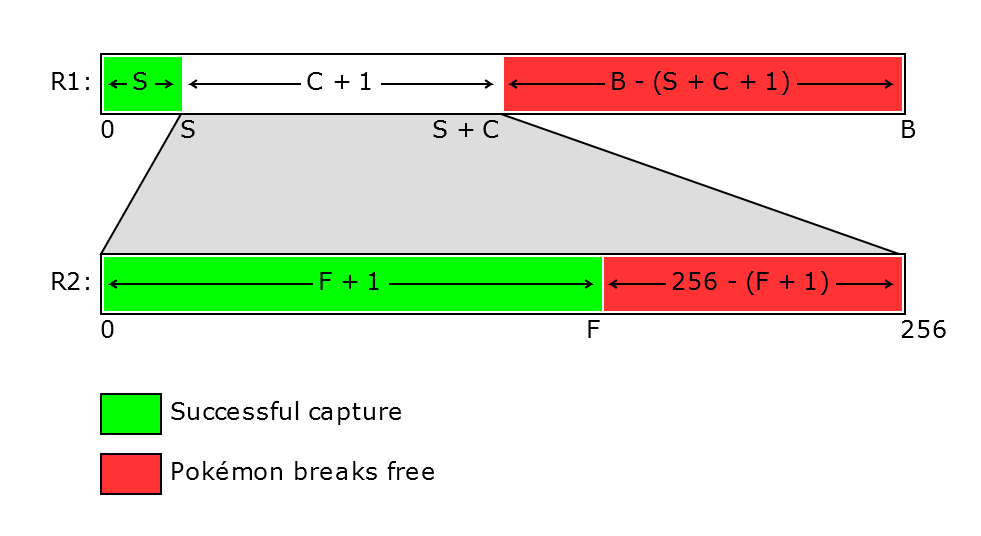
If we assume that R1 and R2 are perfectly randomly distributed (please put a pin in this), it's straightforward to derive a formula for the total odds of capture from this. What we want is the sum of the two possible paths leading to the Pokémon being successfully caught: first, the case where R1 is within the auto-capture range (the chance of which should be S / B, since S out of B possible values of R1 give us that result), and second, the case where R1 is within that white range in the middle (the chance of which should be min(C + 1, B - S) / B) and subsequently R2 <= F (the chance of which should be (F + 1) / 256 - again, it's F + 1 because we're counting the R2 values from 0 to F inclusive). This directly gives us the following:
`"Chance"_"theoretical"=S/B + (min(C + 1, B - S))/B * (F + 1)/256`
Note that these are not mathematical operations performed by the game; the only actual arithmetic it's doing is within the F variable, while this is a theoretical probabilistic formula derived from the structure of the algorithm. That means these divisions are not integer divisions, and this formula can be rearranged at will without producing rounding errors or the like. Thus we could, for instance, combine those divisions by B and get this equivalent, perhaps somewhat cleaner formula:
`"Chance"_"theoretical"=(S + min(C + 1, B - S) * (F + 1)/256)/B`
You'll see that version again a bit later, but for most of the explanation I'll be referencing the former version. Recall also that the F value, the HP factor, is derived from the Pokémon's maximum HP (M), current HP (H), and a value we can call G, which is 8 for Great Balls and 12 for all other balls, as follows:
`F=min(255, |__(|__(M*255)/G__|)/(max(1, |__H/4__|))__|)`
You probably still don't have a very good idea what any of this really means, but that's okay; we're getting to that. Let's go over the values in the formula, what they mean and how they theoretically affect the result.
S (Status Conditions)
This is a simple variable: it is 25 if the Pokémon you're trying to catch is asleep or frozen, 12 if it's poisoned, burned or paralyzed, and 0 otherwise.
Unlike the post-Advance games' formulas (but like the second-generation formula), the status is factored in not as a multiplier but an addition. This leads to two interesting conclusions. First, it means that status conditions essentially give a certain baseline chance of capturing the Pokémon - S out of the B possible R1 values will always mean you catch the Pokémon, regardless of its catch rate and HP. Second, addition has a proportionally greater influence the smaller the original value is - think of how if you add 100 to 100, you're doubling it, whereas if you add 100 to one million, the change is barely worth mentioning. This means that while status does provide a substantial improvement to the odds of a successful capture even if your chances are already pretty good, it makes a truly massive difference when you're trying to catch something like a legendary. This is extremely important to keep in mind when capturing hard-to-catch Pokémon in Red, Blue and Yellow.
C (Capture Rate)
This is simply the base catch rate of the Pokémon species, ranging from 3 (for legendaries) to 255 (for common Pokémon like Caterpie and Pidgey). The values for the Kanto Pokémon are mostly unchanged in the later generations, with a couple of exceptions: Raticate went from a catch rate of 90 in R/B/Y and G/S/C to a catch rate of 127 in R/S, and in Yellow only, Dragonair and Dragonite's catch rates were changed to 27 and 9 respectively, while both in R/B and the later games they have a catch rate of 45 like Dratini. For any other Pokémon, you can look up the catch rate in an online Pokédex of your choice and it will be the same as in R/B/Y. (Of course, if you use my calculator, you won't have to look anything up.)
If you look back at the visualization image above, the capture rate's role in the algorithm is to determine the size of the white part of the top bar: out of the B possible values R1 can take, C + 1 of them (or more accurately, min(C + 1, B - S), since the capture rate window obviously can't be bigger than all the B values that aren't in the status auto-capture window) will lead to the HP factor check happening. All values of R1 that don't fall either within the status auto-capture window or the capture rate window are auto-failures. For a legendary (with capture rate 3), there are therefore always only four (3 + 1) possible R1 values for which the game will look at the legendary's HP at all, for instance.
That capping when C + 1 is greater than B - S has some interesting consequences - one of them is that effectively, once the Pokémon's catch rate is higher than B - S, going beyond that no longer has any effect on the algorithm. Thus, for instance, if you're using an Ultra Ball (B = 151), there is no difference between a Pokémon with catch rate 190 and one with catch rate 255. They simply become exactly equivalent.
B (Ball Modifier) and G (Great Ball Modifier)
Quite unlike the ball bonus multiplier of the later games, there are two ball-related modifiers in the R/B/Y formula, both of which are primarily divisors, meaning a lower value for them should in principle mean a higher chance of a successful capture. In the later games, a Poké Ball has a ball bonus multiplier of 1, with a Great Ball having a ball bonus of 1.5 and an Ultra Ball having a ball bonus of 2, forming a straightforward linear progression from worse to better balls. In R/B/Y, however, the ball modifier B is 256 for Poké Balls, 201 for Great Balls and 151 for Ultra Balls and Safari Balls, and furthermore the G value in the calculation of the HP factor (the F variable) is 8 for Great Balls but 12 for all other balls.
This makes it harder to see at a glance just how much more effective the better balls actually are than plain Poké Balls in R/B/Y. However, we can look at the balls' role in the algorithm and figure out what the general idea is meant to be. Let's look at our visualization again:
- Firstly, the B value determines the size of the top bar. A lower B value helps by making the red auto-failure portion on the right side smaller, and thus also making the status auto-capture window and the capture rate window proportionally bigger. For a Pokémon with a high catch rate, however, where there is no auto-failure window, all that lowering the B value past that will do is make the status window (if any) proportionally bigger. Thus, for a Pokémon with a catch rate of 255, a Great or Ultra Ball won't actually be any better than a Poké Ball unless there's a status condition! For any non-statused Pokémon with a catch rate of 200+, it makes no difference to the R1 check whether you use a Great or Ultra Ball. And for any Pokémon with a catch rate over 150, the Ultra Ball won't have the full advantage it's meant to.
- Secondly, the G value is part of the HP factor. G is a divisor on the HP factor value, and it's 8 for Great Balls but 12 for all other balls - which means that until it hits its cap of 255, the HP factor is significantly higher for Great Balls than for other balls, including Ultra Balls - specifically, about 33% higher! This is good, since the second random number R2 is being compared against the HP factor, and you catch the Pokémon if it's less than or equal to it. Even for Pokémon with relatively low catch rates, this actually theoretically outweighs the Ultra Ball's advantage as outlined above if there is no status condition.
This means that Great Balls are actually better than Ultra Balls in many cases, by design! Pokémon with very high catch rates, in particular, will be way easier to catch in a Great Ball than an Ultra Ball, especially when not afflicted with a status condition, and even Pokémon with lower catch rates should be a little easier to catch in a Great Ball if there's no status, assuming the cap on the HP factor isn't tripped. When is that cap tripped? Well...
F (HP Factor)
This is where the current health of the Pokémon you're trying to catch comes in, making it easier to capture a Pokémon that has been weakened. To recap, the F value is given by the following formula:
`F = min(255, |__(|__(M*255)/G__|)/(max(1, |__H/4__|))__|)`
where M stands for the Pokémon's maximum HP, H stands for the Pokémon's current HP, G stands for the Great Ball modifier discussed above (8 for Great Balls, 12 otherwise), and `|__x__|` stands for rounding x down to the nearest integer. A higher F value means a greater chance of a successful capture.
First things first, let's see what sort of value is going to come out of this for both possible G values. If we plug in H = M to represent a full-health Pokémon and ignore rounding errors, we get...
`F = min(255, |__(|__(M*255)/12__|)/(max(1, |__M/4__|))__|) ~= (M * 255/12)/(M/4) = 255 * 4/12 = 255/3 = 85` (Poké/Ultra/Safari Ball)
`F = min(255, |__(|__(M*255)/8__|)/(max(1, |__M/4__|))__|) ~= (M * 255/8)/(M/4) = 255 * 4/8 = 255/2 = 127` (Great Ball)
Again, note how the Great Ball gives a substantially bigger value for the HP factor. Thanks to rounding errors, the actual HP factor can be a bit higher than these values for a full-health Pokémon, depending on its exact HP value, but it can never be lower.
Ignoring rounding errors, the formula the HP factor is going for is essentially 255 * (M / 2H) for Great Balls and 255 * (M / 3H) for all other balls, which at a glance makes sense as a way to do something like this: at full HP you'll get 255 * (1/2 or 1/3) out of that, and then as H drops, the value will rise. But if left unchecked, the result of that would just rise ever faster and faster, which would lead to absurd results - the value for 4 HP would be twice as high as for 8 HP. That's where the HP factor cap comes in: once you've whittled the Pokémon's HP down enough to make the HP factor value 255, lowering its HP more will no longer have any effect upon its catch rate.
So, just when is this cap of 255 tripped? Well... it only takes a little rearranging of those formulas to show that it happens at around half HP for a Great Ball, and around one third HP for other balls. (This also means that while Great Balls start out with a higher HP factor, Ultra Balls will catch up if you lower the Pokémon's HP.)
You may be doing a double-take right now. But yes, it's true! With or without status effects, regardless of catch rates, lowering the Pokémon's HP below one third, or one half if you're using a Great Ball, does absolutely nothing to help you catch it. Continuing to painstakingly deal tiny slivers of damage beyond that is simply a waste of your time and effort. No wonder False Swipe wasn't made until the second generation - leaving a Pokémon at exactly one HP is not actually useful in any fashion in R/B/Y! All you need is to get it down to one third and start throwing balls.
For a low-health Pokémon whose HP factor has reached the cap, regardless of the ball used, the theoretical formula simplifies beautifully to
`"Chance"_"LowHP" = (S + min(C + 1, B - S))/B`
W (Wobble Approximation)
But what about the wobbling? What's all that weird calculation the game is doing just to figure out how many times the ball is going to wobble?
Well. Let's analyze just what the game is doing there, shall we? Most of the variables involved in the wobble calculation are the same or basically the same as in the actual capture formula, so I'll use the same variable names, but since the status factor in the wobble formula is not the same (it's 10 for sleep/freezing and 5 for poisoning/burns/paralysis instead of 25 and 12 respectively) I'll call that S2. With this in mind, here's the formula the game is evaluating:
`W = |__(|__(C * 100)/(B - 1)__| * F)/255__| + S_2`
Hmm. Doesn't this formula look just the slightest bit familiar? No? How about if we ignore the roundings and rearrange it just a bit...
`W = 100 * (((B - 1) * S_2)/100 + C * F/255)/(B - 1)`
...and note that for Poké Balls in particular, `((B - 1) * S_2)/100` gives a result uncannily close to the S variable from the theoretical success formula...
`W = 100 * (S^"*" + C * F/255)/(B - 1)`
...doesn't it look just a little bit like simply a hundred times a variation of another formula we know, with some off-by-one errors and a cap removed?
`"Chance" = (S + min(C + 1, B - S) * (F + 1)/256)/B`
Now, I can't claim I know what Game Freak were thinking when they programmed this calculation. But I would bet money that what the game is trying to do here with the wobbles is to calculate a percentage approximation of its own success rate. When the ball misses, it's because the game estimates your chances are less than 10%, whereas if it wobbles once it's guessing 10-29%, twice means 30-69%, and three times means 70% or more.
This approximation isn't completely in line with that theoretical formula. They failed to account for the status bonus being affected by the ball modifier (as noted above, `((B - 1) * S_2)/100` only approximates S for Poké Balls); the one that should be added to the C value has some significance for very low catch rates; and of course, it ignores the cap on C + 1. What's up with that? Well, they could be mistakes - we are talking about the same programmers who made the stat modification system, after all - but more charitably, I expect they wouldn't really have particularly wanted to waste the additional overhead it would take to be more precise about it for something not exactly significant; it's not as if the player even has much of an idea what the wobbles are supposed to mean in the first place! (The collective fandom had no idea about this until I first wrote it up here in early 2011, to the best of my knowledge.) It's a serviceable enough approximation for the game's purposes, and that's plenty.
Notice anything interesting about it, though? This is a completely static calculation with no random factor to it whatsoever, and that means (unlike the later games) the number of wobbles in R/B/Y is always the same given the Pokémon's HP, catch rate, status and the type of ball. If you just keep throwing the same balls, without the Pokémon's HP or status changing in between, you will always see the same number of wobbles on failure, depending on the outcome of this calculation.
That means that, for instance, if you've landed in one of those situations where it says the ball misses, such as throwing Ultra Balls at a full-health Articuno, it will always say the ball misses - except when you're about to catch it for real! So the moment you see it actually go into the ball, you can already start celebrating. It was easy back in the day to assume that if the ball was missing, the Pokémon was impossible to catch without weakening it more - but this was never the case. It's just R/B/Y's version of when the ball breaks open immediately without wobbling in the later games.
Conversely, if you try to catch a sleeping full-health Caterpie in a Great Ball, the ball will always wobble three times if you fail - you'll never see the ball miss there, or break out after one or two wobbles. This also contributed to the sense that the ball missing must mean something special: it barely ever happened, because it would only happen for Pokémon with very low catch rates. Many of us would be seeing that message for the first time when battling our first legendary.
But Wait, There's More...
All of the above is assuming that the random numbers in the formula are truly random and independent of each other. However, it's actually a bit more complicated than that. Computers cannot produce true randomness, so instead they simulate it with pseudo-random number generators, and as a consequence of how the random number generator in R/B/Y is designed and how it's being used here, the actual results can be significantly skewed when you're using Great or Ultra/Safari Balls.
The details of this are pretty involved, and so I've explained it on a separate page about the RNG mechanics. It's pretty fascinating, I promise - but if you'd really rather not, or if you try to read it and get completely lost, feel free to ignore the why and just move on to the what.
In very short, the skewed RNG means that...
- Poké Balls work exactly as intended; there is no weirdness with them.
- Great Balls are close to how they were intended, underperform ever so slightly for high catch rates but are better than expected for lower catch rates especially as the Pokémon's HP is lowered.
- Ultra and Safari Balls significantly underperform against Pokémon at more than two thirds of their HP with no status but also significantly overperform when the Pokémon is brought to low HP first.
- Status conditions significantly overperform compared to the theoretical S/B baseline chance that they should give when using Great or Ultra/Safari Balls; they are especially effective for the latter, because all RNG weirdness effects are bigger for Ultra/Safari Balls, but status conditions are also better than they should be when using Great Balls.
- Ultra Balls are actually worse than Poké Balls against a full-health Pokémon with a high (>200) base catch rate! (But this is an edge case; please don't conclude from this that Ultra Balls are worse than Poké Balls in general.)
- The hard-to-catch Pokémon in the Safari Zone - Chansey, Tangela, Kangaskhan, Scyther, Pinsir, Tauros, and Dragonair in Yellow - are genuinely significantly harder to catch than intended thanks to RNG nonsense, and unfortunately in the Safari Zone you can't mitigate this by inflicting status or lowering their HP.
Check the RNG mechanics page for a look at why all of this happens and some fun visualizations of it.
In Plain English
Confused by all the math talk? All right; here's a plain, summarized, as-few-numbers-as-possible version of the unexpected conclusions of the algorithm. Remember, this is all stuff that applies to R/B/Y only; it does not work this way in the later games, including FireRed and LeafGreen.
First of all, regardless of anything else, if the targeted Pokémon has a status affliction, you get a set extra chance to capture it depending on the status and the Pokéball you're using, before the game even starts checking the Pokémon's HP and whatnot. These chances are listed in the following table:
| Ball | PSN/PAR/BRN | SLP/FRZ |
|---|---|---|
| Poké Ball | 4.69% | 9.77% |
| Great Ball | 7.62% | 14.52% |
| Ultra Ball | 11.07% | 21.11% |
Your overall chance of capturing the Pokémon if it has a status affliction will never be less than the chance stated above, even if it's a legendary at full health - this is a check the game applies before it even looks at the HP or catch rate, after all. This makes status by far the most viable way of increasing your chances of getting a legendary - the improvements to be made by lowering their HP are frankly negligible in comparison. (The chance of catching an average full-HP sleeping Mewtwo in an Ultra Ball is 21.634%; if you also bring it to low HP, that only boosts it to 23.752%.)
Second of all, lowering a Pokémon's HP down further than to about one third of its max HP has no effect at all on its catch rate. If you're using Great Balls, in fact, that cutoff point is at one half rather than one third. Painstakingly shaving off slivers until the HP bar is one pixel wide is and always has been a waste of time in R/B/Y. However, lowering its HP to one third is highly beneficial if there's no status or the Pokémon has a relatively high catch rate, especially if you're using an Ultra Ball.
Third, Great Balls are actually better than Ultra Balls in many cases - specifically, if the Pokémon is at around half of its HP or more, and either there is no status condition in play or the Pokémon has a high intrinsic catch rate. However, if you lower the Pokémon's HP down below one third, Ultra Balls will always be at least as good, and for lower catch rates with a status condition, Ultra Balls will be better even at full HP. Generally, you should use Great Balls if you want to catch quickly, without having to inflict status or damage, or if it's a Pokémon with a high catch rate - but for all difficult captures, the best strategy is to put it to sleep and use an Ultra Ball.
Fourth, wobbles are a loose indicator of the game's approximation of your chances of capturing the Pokémon at the current status and HP with the current ball. This approximation can be significantly flawed, especially when status or high catch rates are involved, but I would guess accuracy wasn't particularly a priority for the programmers, considering it's just determining how many times you'll see a ball wobble on the screen before a breakout. Roughly:
| Wobbles | Message | Approximated chance of capture |
|---|---|---|
| 0 | "You missed the POKéMON!" | < 10% |
| 1 | "Darn! The POKéMON broke free!" | 10-30% |
| 2 | "Aww! It appeared to be caught!" | 30-70% |
| 3 | "Shoot! It was so close too!" | >= 70% |
Notice that the message "You missed the POKéMON!" is simply R/B/Y's version of the ball breaking without wobbling. The message confusingly implies that the Pokémon is currently impossible to catch, but in reality, if you keep chucking balls, you'll eventually get it - it's just that your chances are low.
The catch rate calculator below will show this approximation and the number of wobbles in addition to the actual chance when "Show detailed report" is on, if you're interested.
Visualization
To visualize how your chances of capturing a Pokémon change depending on HP, status, ball and catch rate, you can play with the graph below.
The graph shows dotted lines for the theoretical catch rate for Great and Ultra Balls - i.e. the catch rate as calculated by the intended formula, as if the game had an unbiased random number generator, as a point of comparison for the actual catch rates. There is no theoretical line for Poké Balls, since Poké Balls always work as intended with no RNG bias.
(Worth noting: the graph is somewhat idealized; in actuality, the lines on it should be jagged like a staircase, because the HP factor jumps at 4HP intervals, rather than changing smoothly. I chose to assume the Pokémon has 200 max HP, plot 50 data points for each line, and let the graph draw straight lines between them to better show the overall shape of the graph.)
Catch Rate Calculator
The catch rate calculator for the first-generation games is now its own page; look there to easily determine your chances of capturing a Pokémon in R/B/Y without manually working through the formulas.
Page last modified November 20 2025 at 17:02 UTC
Post comment
Inflammatory or off-topic comments will be deleted; please go to the guestbook for discussion unrelated to this page. You can use BBCode (forum code) to format your messages.
Giving an e-mail address is optional; if it is given, you will be notified by e-mail if I respond to your post. If you fill in a website (this should be your own website, blog or social media profile), it will be linked publicly on your post; however, messages obviously posted solely as a pretext for advertising, or advertising shady or inappropriate websites, will be deleted.
- [b]Bold[/b]
- [i]Italic[/i]
- [u]Underlined[/u]
- [s]Strikethrough[/s]
- [url=http://www.dragonflycave.com]Link[/url]
- [spoiler]Spoiler[/spoiler]
Comments
My own messages will be signed as Butterfree, with the Admin label below my name. If someone signs as Butterfree without that label, it's probably not me.
Pages: 1
 Ahmet
Ahmet
 BT
BT
Pages: 1